5. Add Your First Product
The quickest way to add a product to your system is by using the Ribbn app and our AI QuickList tool.
Step 1: Download the Ribbn App
Scan the QR code or search for “Ribbn” in your phone’s app store.

Step 2: Log In
Use the same email you used when setting up your Ribbn account. A one-time passcode will be sent to your inbox—no need to remember passwords.
Step 3: Add a New Product with AI Quicklist
-
Tap the Inventory icon at the bottom of the app.

-
Then tap the +T-shirt icon at the top left to start using AI QuickList.

Step 4: Snap Product Photos
Follow the in-app guide to capture key photos:
-
Front Photo: Take a clear image of the item’s front. Press Next
-
Brand Tag: Photograph the brand or logo. If none, tap the info box to enter it manually.
-
Size Tag: Snap the size label, or enter manually if missing. For items without sizing, use "One Size."
-
Material Tag: Take a photo of the composition label (skip if not available).
Step 5: Add Core Product Info
After your photos are uploaded:
-
Seller: With AI Quicklist it is assumed that you as a store will be the seller. If you want to add a product that's other people's inventory we advice you to not choose AIQuicklist but the Regular mode where you can choose seller.
-
Primary Segment: Select the right category from your product taxonomy (learn more about Product Taxonomy here).
-
Condition: Choose the appropriate item condition.
Tap Generate with AI to create the product using your photos and input—this may take a few seconds.
Step 6: Review and Edit
AI will auto-fill product details using your photos. Review each field and make edits if needed.
You don’t need to fill every field—but the more info you add, the easier it is to filter and manage your inventory later.

AI will also help generate a suggested Listing Price based on market value but make sure to review this or add if AI couldn't find a good match based on your photos.

Good to know: About 90% of the work is now done. When (or if) you're ready to publish this product online, you’ll just need to auto-generate the final product description.
When you're satisfied, tap Save (top right) or Submit Edits (at the bottom).
Step 7: Final Check
After saving, you’ll see the full product view. Tap the pencil icon if you need to make changes.
That’s it—you’ve just added your first item to your inventory. Great job!
Optional: Add a New Product in Regular Mode
If you already have high-quality photos or want to list products from another seller’s inventory, Regular Mode gives you more control but is also more manual.
-
Upload product photos from your library or take new ones directly.
-
Want to link an RFID tag? Simply tap the RFID button and scan the tag to connect it to the product.
After that, you can manually enter all product details.
Need help understanding what each field means? Check out the article: How to Understand Product Attribution in Ribbn.
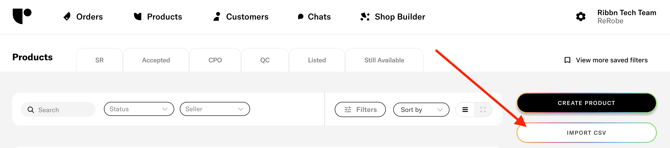
Import products from a CSV file
Already have products elsewhere? Import them easily with this Product Import Template. Download the template and start fill it with your own product data.
Once ready to import, go to: Products > All products > Import CSV file